Difference between revisions of "Installation How To VistA/GT.M coLinux"
(→Quickstart coLinux) |
m (→(work in progress)) |
||
| Line 1: | Line 1: | ||
==(work in progress)== | ==(work in progress)== | ||
| − | |||
==Quickstart coLinux== | ==Quickstart coLinux== | ||
Revision as of 23:26, 23 August 2005
(work in progress)
Quickstart coLinux
1.The coLinux Wiki has adequate instructions. I will try to guide GT.M/VistA users to the most straight-forward route to a successful installation. There are many alternative configurations possible, some more problematic than others.
2.CoLinux is delivered as a self-installing executable. We can either: a.Download coLinux-stable from sourceforge. (The current version as of this writing is 0.6.2-linux-2.6.10 found at: http://sourceforge.net/project/shownotes.php?release_id=302431) or : b.Obtain a more recent snapshot of the current testing version from the wiki itself at http://www.colinux.org/snapshots/ We will be working with the snapshot of version 0.6.3-pre13. Note that this is a self-installing binary: stable-coLinux-20050524.exe that produces a patched kernel-2.6.11.
3.The coLinux install can be anywhere on our XP machine. I have chosen to keep everything under C:\vfc\colinux . I will bold "C:\vfc\colinux" wherever a substitution should be made to use some other root directory. Run the colinux.exe to get this installation dialog:

I suggest selecting all four of these components unless this is not a “virgin” install. This saves some manual labor and potential confusion. Everything goes into our chosen directory:

The next decision point is whether to download a root filesystem image. We are using the debian default:

It will produce filesystem of approximately 1Gb. (Be warned, we need that space available in our linux root partition.) Once you have a running system changes and creative tweaking can follow later.
We should now have this in our directory “C:/vfc/colinux”:

1.The file Debian-3.0r2.ext3-mit-backports.1gb.bz2 needs to be expanded to its full size. I installed 7-Zip for that purpose. The expanded Debian-3.0r2.ext3-mit-backports.1gb occupies 1,048,576 KB. I moved the bz2 to my archive directory.
2.Next is a swap file. There are utilities for rolling our own detailed on the Wiki. Or just download one from: http://gniarf.nerim.net/colinux/swap/ . It will need to be expanded from its .bz2 to the correct size.
3.Next, we must tweak our colinux configuration file to match this installation. This ships as default.colinux.xml and needs to be edited, thus:
<?xml version="1.0" encoding="UTF-8"?>
<colinux>
<block_device index="0" path="\DosDevices\c:\vfc\coLinux\Debian-3.0r2.ext3-mit-backports.1gb" enabled="true" />
<block_device index="1" path="\DosDevices\c:\vfc\coLinux\swap_512Mb" enabled="true" />
<bootparams>root=/dev/cobd0</bootparams>
<initrd path="initrd.gz" />
<image path="vmlinux" />
<memory size="64" />
<network index="0" type="tap" />
</colinux>
4.With this much done, we should be able to boot coLinux.
I start inside the Command Prompt because it helps with debugging. We go to our colinux directory:
C:\>cd c:\vfc\colinux
C:\vfc\colinux>colinux-daemon.exe –c default.colinux.xml
Hang on! Here comes debian! a.Root’s password is “root” b.#df –h shows the partition /dev/codb0 is 14% used with 827Meg available. c.Debian linux is all there and running. d.#halt or #reboot exits the system.
5.Now we can make a colinux.default.bat file to boot the system. There is an option to use an nt console: Colinux-demon.exe –c default.colinux.xml –t nt
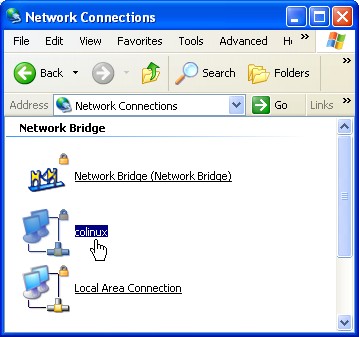
6.Networking: Now this is a whole special topic all its own. It is complex because the host XP operating system must own all the hardware devices. The hardware network interface is shared via a virtual connection from a phony NIC owned by coLinux. There are a couple of methods for accomplishing the link. In the end we should have a connection from within Linux that reaches the Internet via this virtual link.